Cold Work Tool Steels

Cold Work Tool Steels

Air-Hardening Cold-Work Tool Steels

The air-hardening cold-work tool steels, designated as group A steels in the AISI classification system, achieve their processing and performance characteristics with combinations of high carbon and moderately high alloy content. The high alloy content is sufficient to provide not only air-hardening capability, but also a distribution of large alloy carbide particles superimposed on the microstructures developed by heat treatment processing. The alloy carbides have very high hardness relative to martensite and cementite, thus con- tribute to enhanced wear resistance of A-type steels compared to tool steels of lower alloy content Although the alloy content is high and the A-type steels have good temper resistance with demonstrated secondary hardening, their hot hardness relative to other even more highly alloyed tool steels is not sufficient for high-speed machining or hot-work applications; as a result, the A-type tool steels are still largely used for cold-work applications.

Table 11-1 presents the nominal chemical compositions of the A-type tool steels. A major processing advantage of these steels, compared to tool steels that must be water or oil quenched, is that air hardening produces minimum distortion and very high safety and resistance to cracking during hardening. Various combinations of manganese, chromium, and molybdenum contents make possible the air-hardening capability of the A-type steels. Table 11-1 shows that many of these steels are alloyed with about 5% Cr, but others, such A4, A6, and A10, have high manganese contents and lower chromium contents. The latter adjustment in composition permits the use of lower austenitizing temperatures for hardening, which in turn further reduces dimensional changes and minimizes undesirable surface reactions such as decarburization during hardening.

Silicon is a major alloying element in the A8, A9, and A10 steels and helps to promote toughness, in combination with the high carbon contents of A10 steel, silicon promotes graphite formation. The graphite content of A10 steel makes it highly machinable in the annealed condition, and in the hardened condition, the graphite contributes to galling and seizing resistance at tool steel die/workpiece interfaces. Type A7 is the most highly alloyed of the A-type tool steels, and earlier merited a classification of its own as a special wear-resistant cold work die steel. The tungsten and high vanadium contents of A7 steels, combined with high carbon content, produce high volume fractions of alloy carbides; these promote very high wear resistance and good hot hardness, but low toughness.

Hardenability and hardening

Preheating at temperatures about 650 to 675 °C (1200 to 1250 °F) reduces soaking time and the time for decarburization, to which the A-type steels are highly susceptible because of their high carbon content.

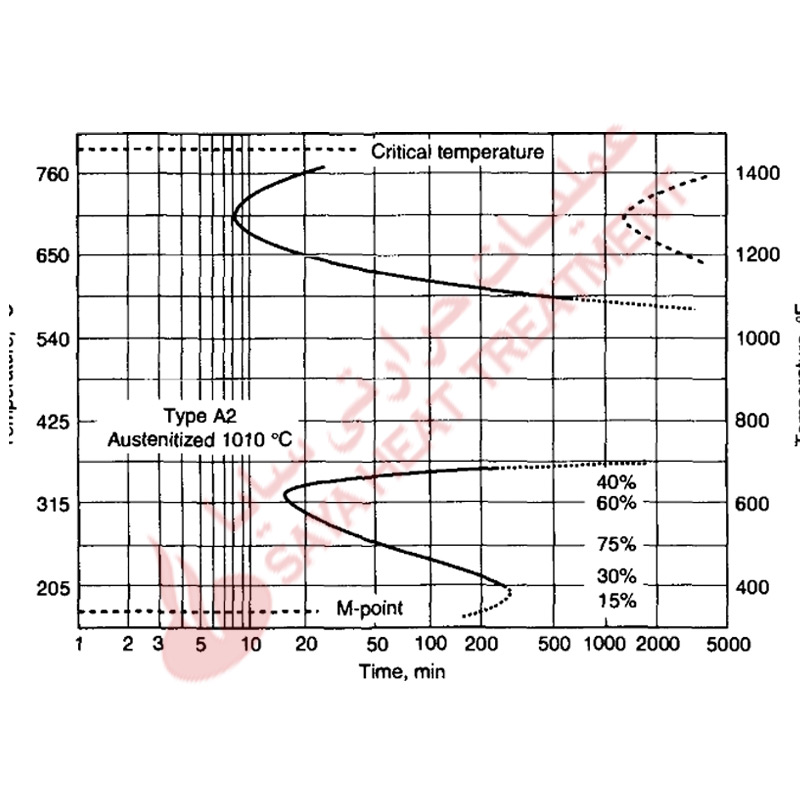
The alloy content of the A-type tool steels severely retards the transformation of austenite to ferrite-carbide microstructures. Figure 11-1 shows an IT diagram for an A2 steel austenitized at 1010 °C (1850 °F). Two well-defined C-curves, one for pearlite and the other for bainite, characterize the austenite decomposition. The A-type tool steels are susceptible to decarburization during austenitizing for hardening, and significant decarburization will lower the surface hardness of hardened parts. Tools should be heated in vacuum, or in salt baths, fluidized beds, or furnaces with neutral or slightly carburizing atmospheres. The rate of decarburization increases with both time and temperature; and decarburization can also be minimized by preheating, which will minimize soaking time at high austenitizing temperatures where decarburization most rapidly develops.

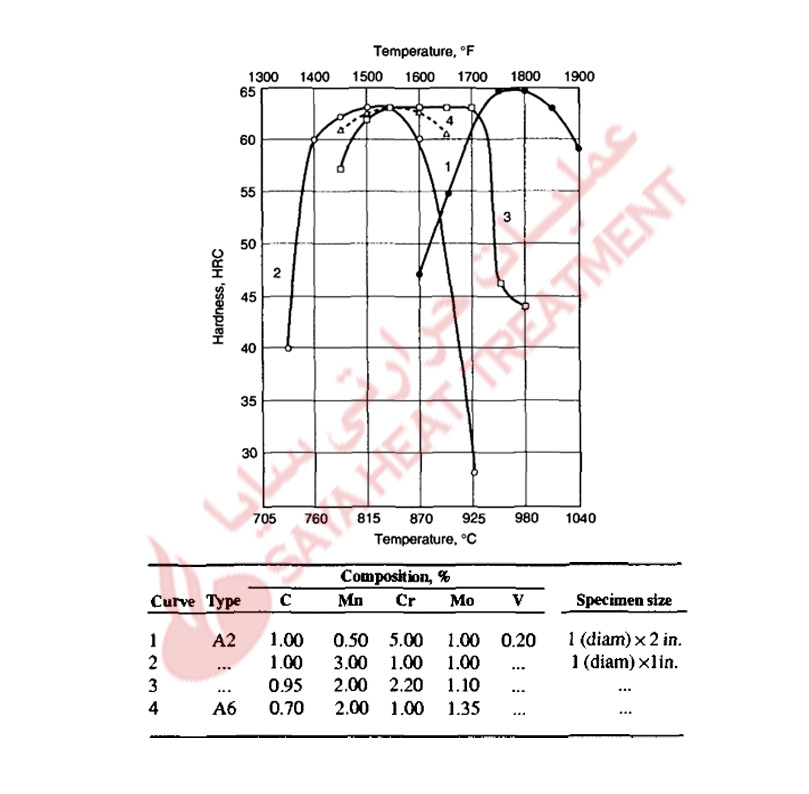
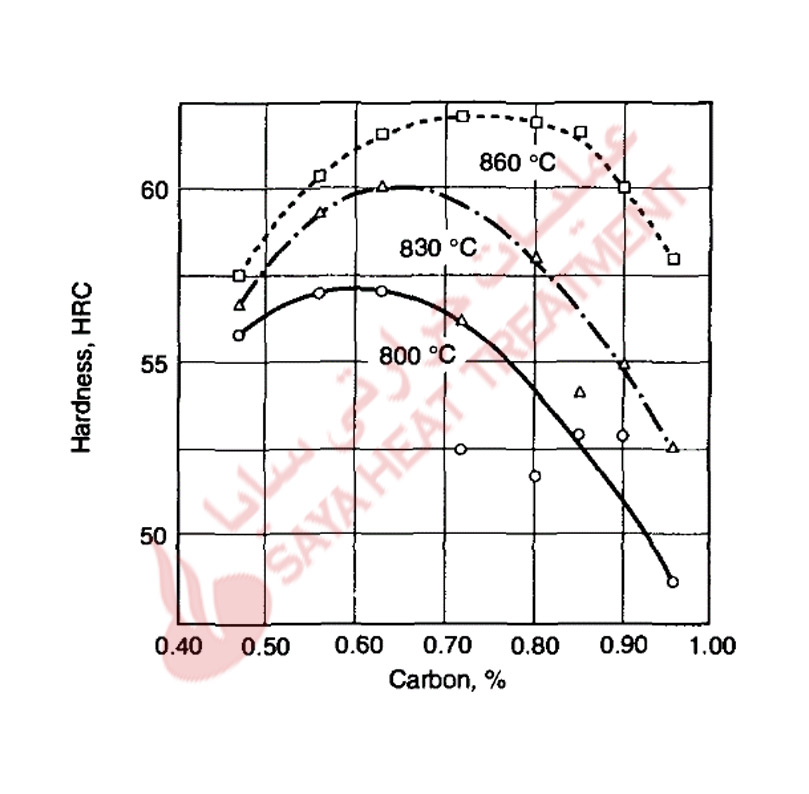
Proper control of austenitizing is critical for the achievement of optimum hardened microstructures and properties in the air-hardened cold-work tool steels. Too low an austenitizing temperature will reduce hardness because of the formation of nonmartensitic microstructures during air cooling. too high an austenitizing temperature will cause too high a content of carbon and alloying elements to dissolve in austenite, lowering M s temperatures and reducing hardness because of excessive retained austenite in the hardened microstructures. These effects of austenitizing produce parabolic curves of as-quenched hardness versus austenitizing temperature, as shown in Fig 11-2 for several A-type steels. The A2 steel with 5% Cr addition requires a higher austenitizing temperature to produce peak as-cooled hardness, whereas the steels with major additions of manganese develop peak hardness after austenitizing at lower temperatures. Figure 11 -3 shows hardness as a function of carbon content for air-cooled A4 steels austenitized at various temperatures. For medium carbon contents, the effect of austenitizing on hardness and hardenability is relatively low because all the carbon and alloying elements are put into solution at low austenitizing temperatures. In the high-carbon steels, the effect of austenitizing temperature is much greater; higher temperatures are required to dissolve the higher quantities of carbides present in these steels after annealing. The results shown in Fig. 11-3 led to the development of A6 steel, which has just sufficient carbon to attain 62 HRC after hardening at the relatively low austenitizing temperature of 875 °C (1575 °F).

Tempering

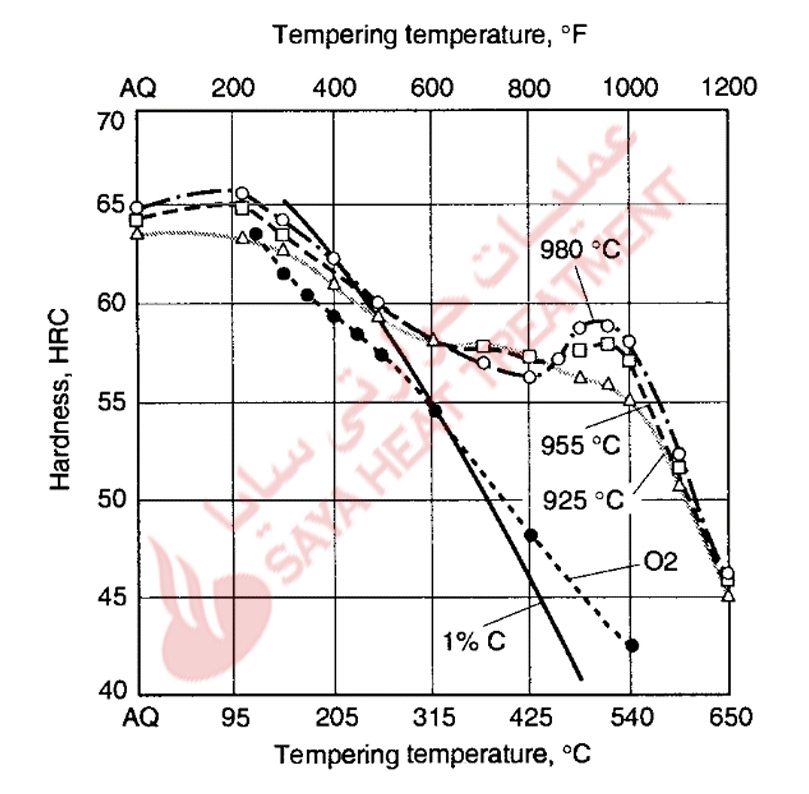
Figure 11-4 shows hardness as a function of tempering temperature for an A2 steel austenitized for hardening at three temperatures, an 02 steel, and a plain carbon steel containing 1 % C. The tempering resistance of the A2 steel is much higher than that of the plain carbon and 02 steel, and a definite but small secondary hardening peak develops in the A2 steel after tempering at about 510 °C (950 °F). The hardness increase due to secondary hardening is highest in specimens hardened at the highest austenitizing temperature. In those specimens, the super saturation of the martensite with carbon and alloying elements is higher than in specimens austenitized at lower temperatures; consequently, the precipitation of alloy carbides at the higher tempering temperatures is most intense.

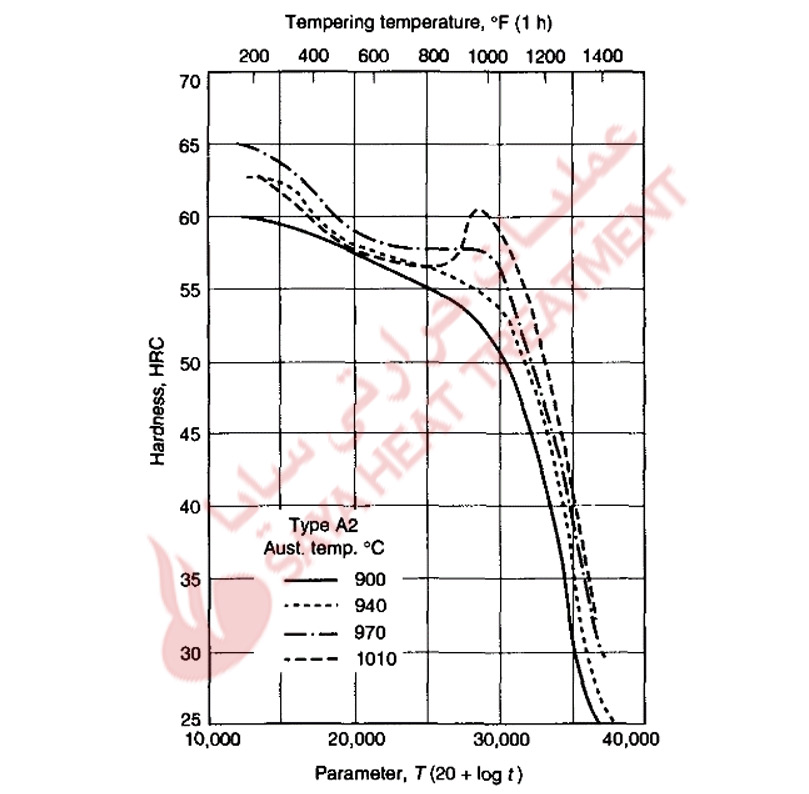
Figure 11-5 plots hardness of an A2 steel austenitized at several temperatures as a function of a time-temperature parameter developed by Hollomon and Jaffe and extended to tool steels by Roberts et al. The fact that logarithm of time is used in the parameter reflects the fact that time has a smaller effect on tempering changes than does temperature.

The retained austenite content of hardened air-hardening steels may be quite high. The retained austenite is thermodynamically unstable at temperatures below the Ai and, must transform to more stable combinations of phases during what is known as the second stage of tempering. In highly alloyed tool steels, austenite transformation may take place in two stages, each with its own set of kinetics.

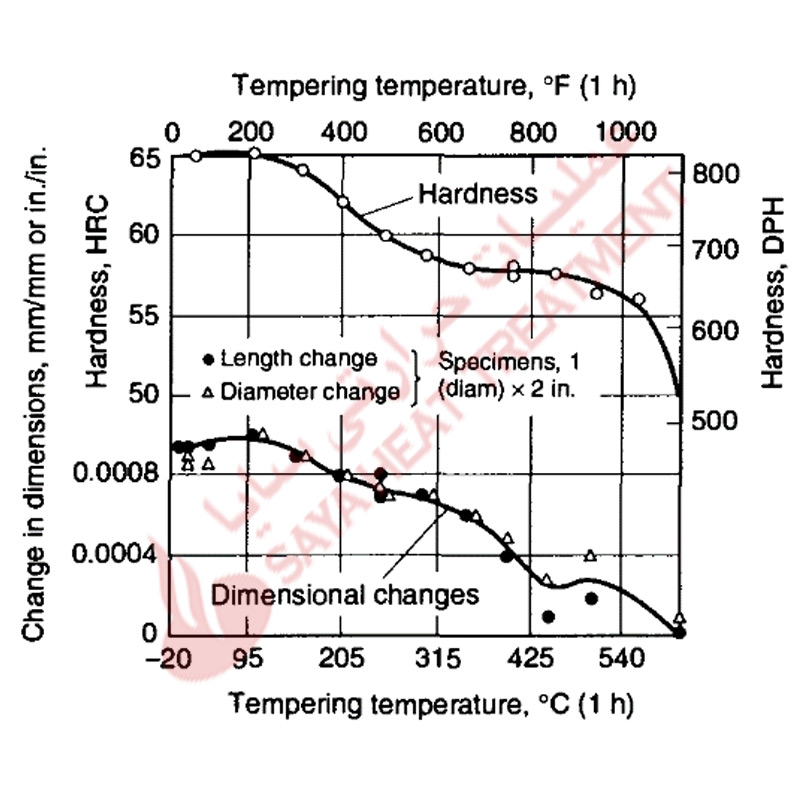
The dimensional changes caused by hardening and tempering A-type tool steels are shown in Fig 11-6 and 11-7. In carbon tool steels the increase in volume due to hardening may be 0.7% of the as-annealed volume, but the volume changes are reduced in tool steels alloyed with chromium. Scott and Gray measured an expansion of 0.001 in all directions of a fully hardened steel containing 1% C and 5% Cr, and showed (Fig 11-6) essentially continuous contraction of the dimensions in a hardened A2 steel with increasing tempering temperature.

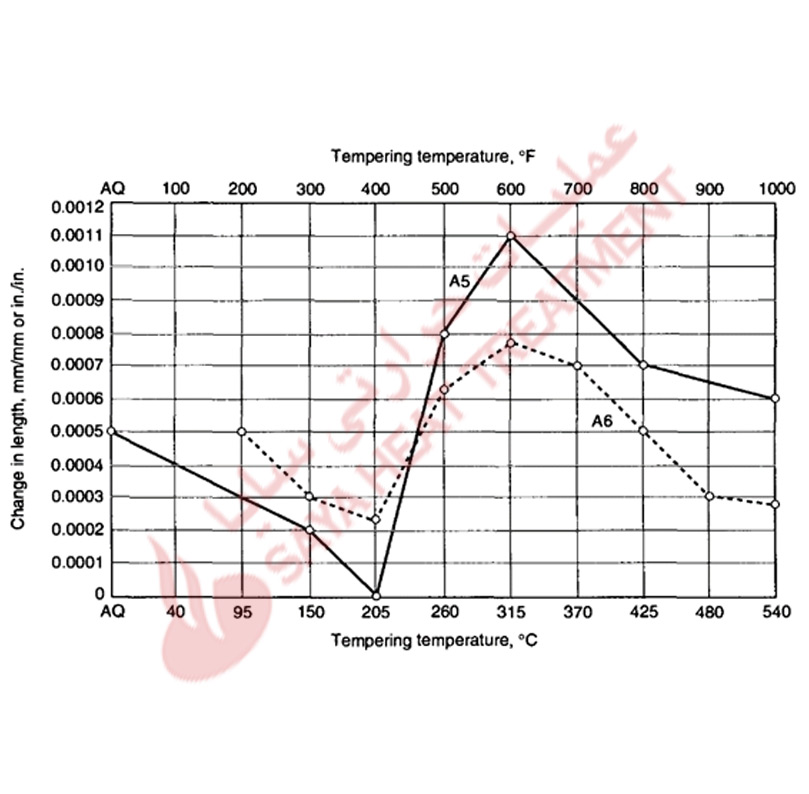
As discussed, retained austenite may be a significant component of the hardened microstructures of A-type steel, and can be controlled by austenitizing, refrigeration, and tempering. For a given hardened structure, transformation of retained austenite during tempering is accomplished at temperatures where hardness may be significantly reduced and where the transformation of the austenite may cause significant dimensional changes (Fig 11-7).

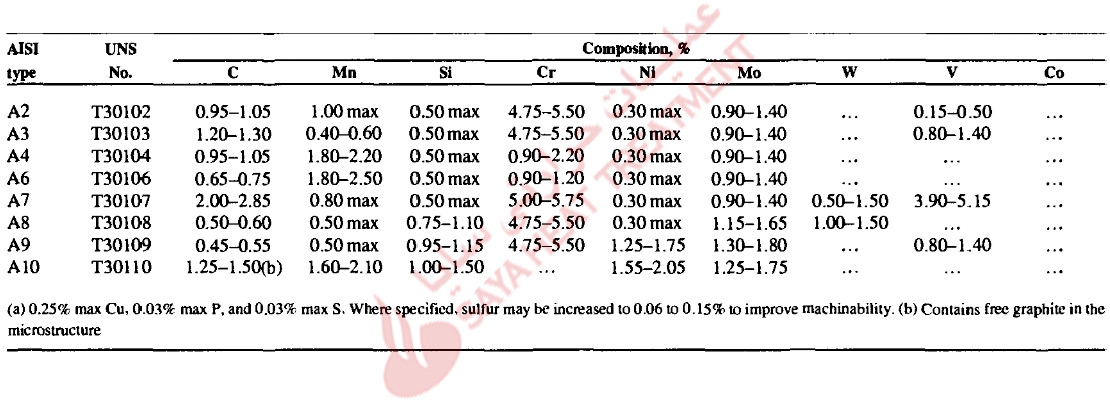
Table (11-1) Composition limits of air-hardening, medium-alloy cold-work steels

Fig (11-1) IT diagram for air-hardening A2 steel, containing 0.97% C, 0.48% Mn, 0.40% Si, 4.58% Cr, 1.04% Mo, and 0.25% V, after austenitizing for 1 h at 1010 °C (1850 °F).

Fig (11-2) Effect of austenitizing temperature on the surface hardness of A-type steels. Specimens were air cooled from the austenitizing temperatures. Curves 1 and 2, Allegheny Ludlum Industries; curve 3, Bethlehem Steel Co.; curve 4, Universal-Cyclops Steel Corp.

Fig (11-3) Effect of carbon content and austenitizing temperature on the center hardness of 100 mm (4 in.) diam bars of A4 tools steel air cooled from the hardening temperature.

Fig (11-4) Effect of tempering temperature on the hardness of A2 tool steel, containing 1.00% C, 0.60% Mn, 5.25% Cr, 1.10% Mo, and 0.25% V, after air cooling from various austenitizing temperatures

Fig (11-5) Master tempering curves for A2 tool steel, containing 1.01% C, 0.70% Mn, 5.36% Cr, 10.6% Mo, and 0.26% V, hardened by air cooling from various temperatures. T is absolute temperature (°F + 460); r is time in hours.

Fig (11-6) effect of tempering temperature on the hardness and dimensional changes of A2 tool steel after cooling from 945 °C (1730 °F). The steel contained 1.00% C, 0.65% Mn, 0.30% Si, 5.20% Cr, 1.00% Mo, and 0.25% V.

Fig (11-7) length change produced on tempering A5 (A4 with 3% Mn) tool steel air cooled from 815 °C (1500 °F) and A6 tool steel air cooled from 845 °C (1550 °F).

Oil-Hardening Cold-Work Tool Steels

The oil-hardening cold-work tool steels, designated as group O steels in the AISI classification system, derive their high hardness and wear resistance from high carbon and modest alloy contents. The high carbon content makes possible the formation of martensite of high hardness, and the alloying elements provide sufficient hardenability to make possible hardening of sections of reasonable size by oilquenching. Alloy content is insufficient to provide the alloy carbides necessary for cutting at high speeds or hot-working applications; therefore, the O-type steels are restricted to cold-work applications.

Table 10-1 lists the nominal compositions of the various O-type tool steels, and Table 10-2 ranks the performance and lists processing temperature data for the steels. The high carbon content of the O-type steels makes possible austenitizing for hardening at relatively low intercritical temperatures where austenite and carbides coexist. The reduced carbon content of the austenite is still sufficient to provide martensite of high hardness and good hardenability, but fine grain size is maintained by the undissolved carbides, and the low hardening temperatures and oil quenching provide relative freedom from cracking of intricate sections. Combinations of alloying elements other than carbon provide various levels of hardenability, as well as special characteristics. For example, the high silicon content of O6 tool steel causes graphite formation, which enhances machinability and may serve as a solid lubricant for improved die life, and the high tungsten content of O7 tool steel provides carbide-containing microstructures that maintain very sharp cutting edges and high wear resistance for applications such as roll turning tools, paper and woodworking knives, and tools for finishing purposes. Parts should always be protected from decarburization during annealing.

All the O-type steels are somewhat sensitive to cracking if rapidly heated to forging temperatures; therefore, preheating to about 650 °C (1200 °F) is good practice. Normalizing, except for large parts, is ordinarily unnecessary, but forged parts should always be annealed before hardening. The following isothermal schedule has been used for annealing Ol and O2 tool steels:

  1. Hold 4 hat 730 °C (1350 °F).
  2. Heat to 780 °C (1440 °F) and hold 2 h.
  3. Cool to 670 °C (1275 °F) and hold 6 h.
  4. Cool in air.

Depending on the size of the charge and thermal inertia of the annealing furnace, an isothermal annealing cycle may sometimes prove more rapid than conventional annealing. As described, the development of a well-spheroidized, annealed microstructure takes considerable time, especially for the tungsten-containing O-type steels.

Hardenability and Hardening

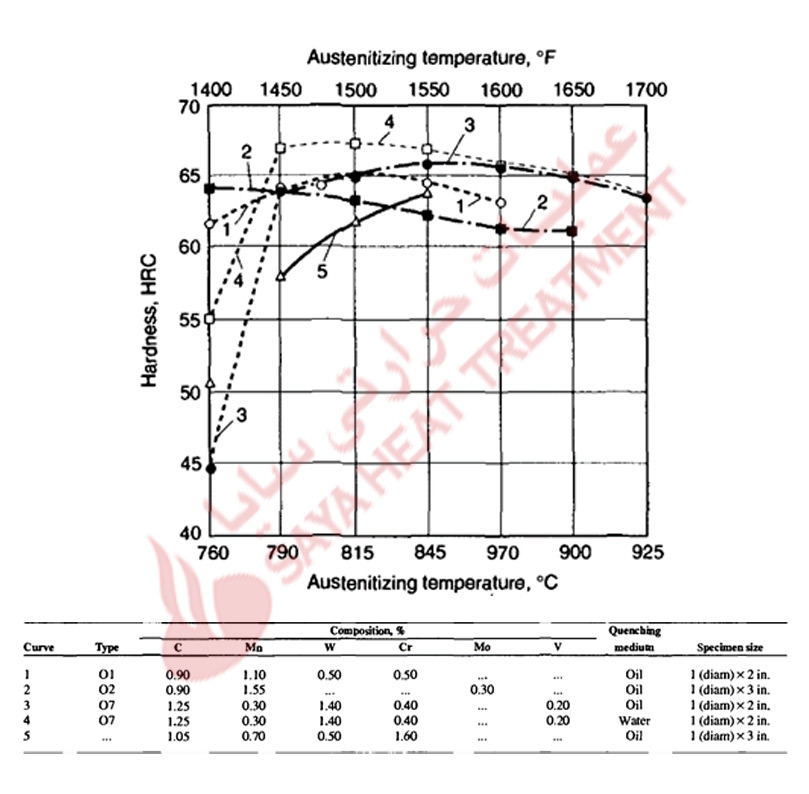
Figure 10-4 shows the effect of austenitizing temperature on the as quenched hardness of O-type steels. Maximum hardness of the O2 steel, containing only manganese and a little molybdenum, is attained at temperatures as low as 760 °C (1400 °F), whereas the chromium and tungsten-chromium grades do not attain maximum hardness before hardening temperatures above 845 °C (1550 °F) are reached.

The O7-type steels are usually hardened by oil quenching, but parts of simple shape may be water quenched safely. In O7 steels with low chromium contents and without molybdenum, water quenching is necessary to harden parts thicker than 25 mm (1 in.). Water quenching also allows the use of lower austenitizing temperatures for hardening, since the more rapid cooling makes up for some of the loss of hardenability due to alloying elements incorporated in retained alloy carbide particles.

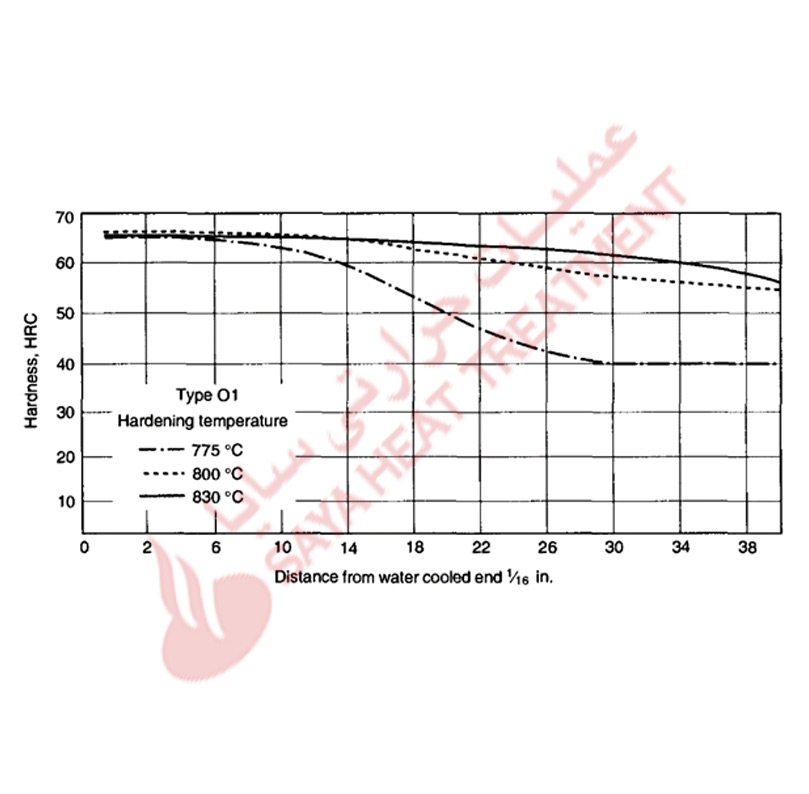
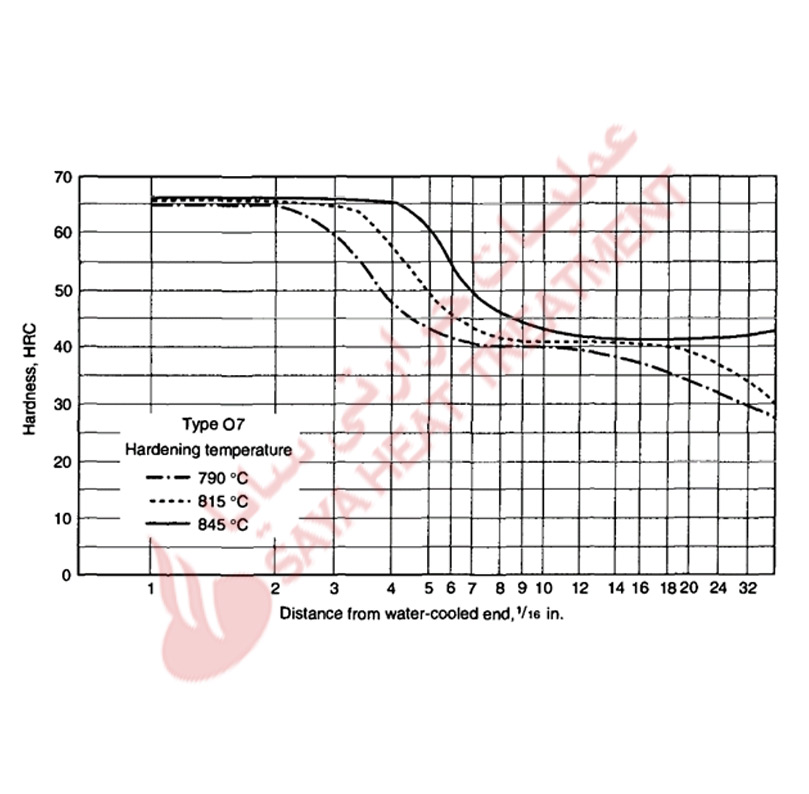
Figures 10-5 and 10-6 show Jominy end-quench curves for Ol and O7 tool steels, respectively. The Ol steel exhibits significantly deeper hardening capacity than does the O7 steel. The Ol steel also shows marked improvement in hardenability when austenitized at higher temperatures, in contrast to the much milder effect of austenitizing temperature on hardenability of the O7 steel. The stability of the tungsten carbides in the 07 steel accounts for its lower hardenability at a given austenitizing temperature, as well as the lower sensitivity of hardenability to austenitizing temperature

The lower hardenability of the O7 steels significantly limits the size of part that can be hardened. For example, through-hardening of Ol steel bars 63.5 mm (2.5 in.) in diameter can be accomplished by oil quenching from 800 °C (1475 °F). The 06 tool steels, which contain silicon and therefore some graphite, also contain additions of manganese and molybdenum and are relatively deep hardening.

Tempering

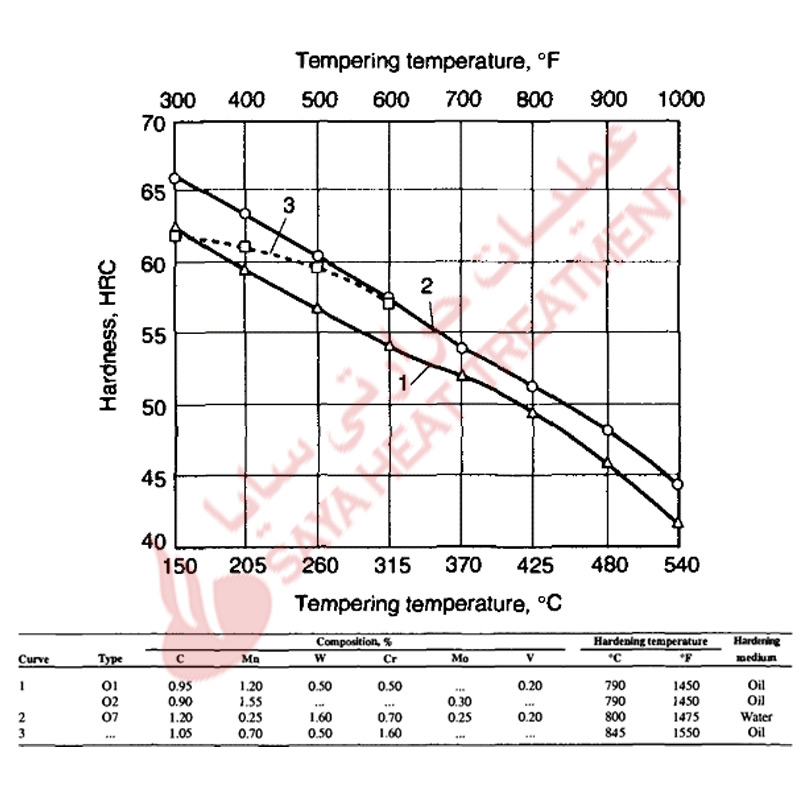
Figure 10-7 presents hardness as a function of tempering temperature for several O-type steels. The O7 chromium-tungsten grades have higher tempering resistance than the 01 and O2 steels. With molybdenum, the tempering resistance of 01 and O2 tool steels is about the same, but without the molybdenum, the O2 steel softens somewhat more rapidly than does Ol steel. Despite these differences, all the O-type steels soften continuously with increasing tempering; therefore, to preserve high hardness the O-type steels are tempered at low temperatures, typically between 150 and 260 °C (300 and 500 °F).

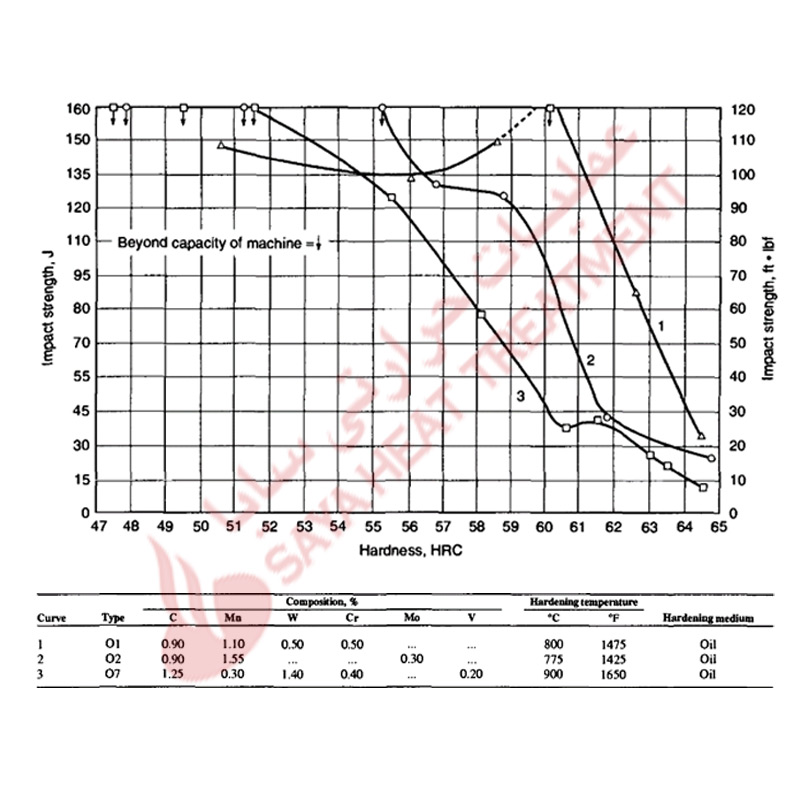
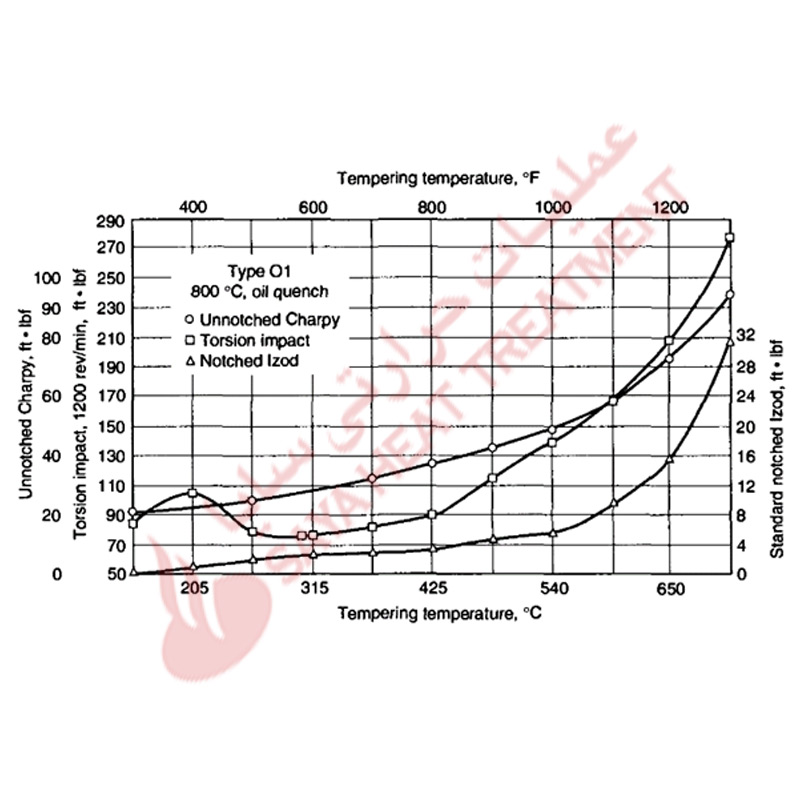
figures 10-8 to 10-9 show measurements of toughness, determined by various experimental approaches, as a function of tempering temperature for hardened O-type steels. Figure 10-8 compares unnotched impact toughness at constant hardness values for three O-type steels. Compared to the O2 and O7 steels, the Ol steel shows the best impact toughness at high hardness.

All the measurements of toughness show a small maximum in specimens tempered between 150 and 260 °C (300 and 500 °F), the tempering temperature range where high hardness is maintained. Toughness then decreases as specimens are tempered in the tempered martensite embrittlement range, where coarse carbide particles are produced by the decomposition of retained austenite. Higher tempering temperatures produce large increases in toughness, or ductility.

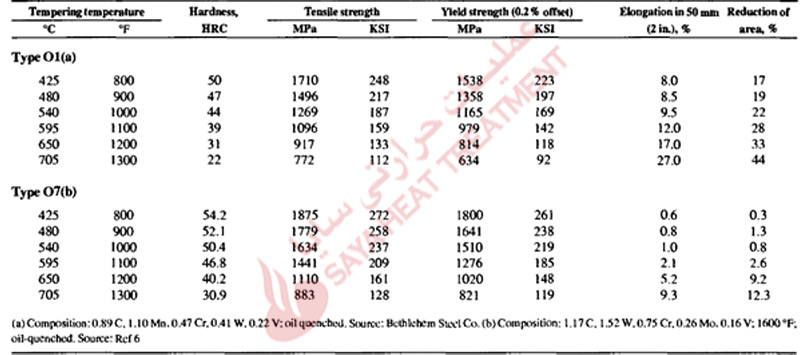
Specimens tempered below 425 °C (800 °F) are too notch sensitive to provide reliable results, but as Table 10-4 shows, mechanical properties can be determined for specimens tempered at 425 °C (800 °F) and higher.

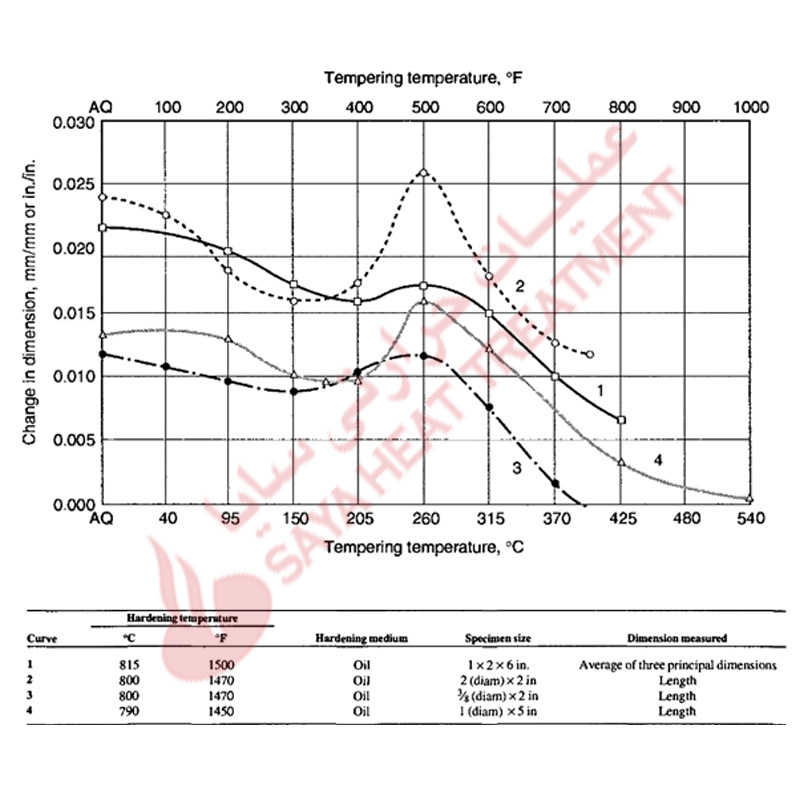
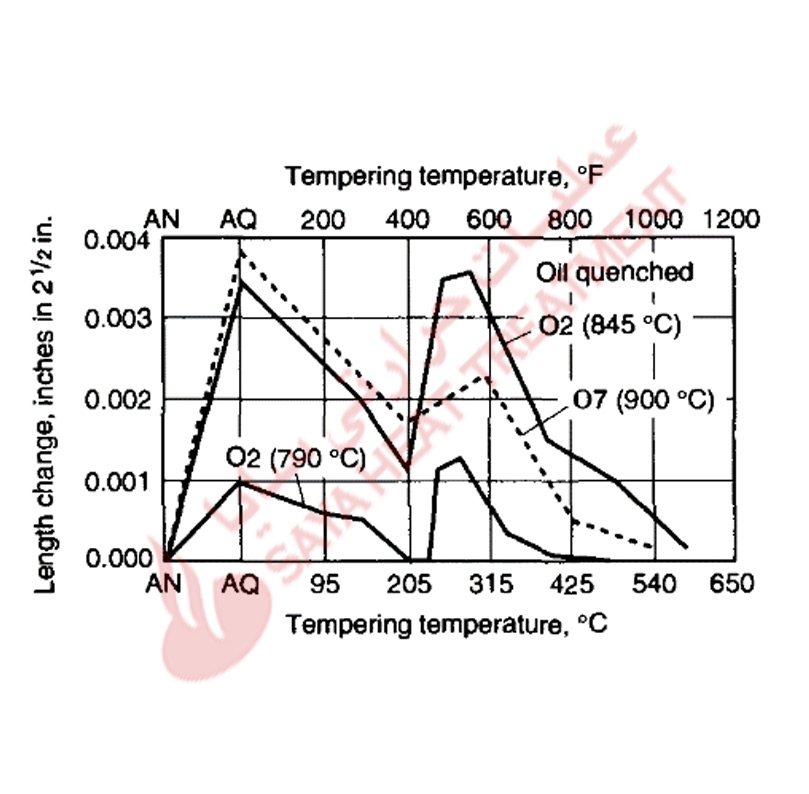
Figures 10-15 and 10-16 show the dimensional changes that occur during tempering of O-type steels. The magnitudes of the dimensional changes depend on specimen size and dimension measured, but all specimens show an increase due to hardening from the annealed state, as best shown in Fig 10-16. The dimensions of as-quenched specimens contract as martensite loses its tetragonality in the first stage of tempering. Figure 10-16 shows that O1 and O7 steel specimens hardened at 845 °C (1550 CF) and 900 °C (1650 °F), respectively, undergo much more expansion on hardening than an O1 specimen hardened at 790 °C (1450 °F).

This observation is explained by the greater solution of carbon in austenite at the higher austenitizing temperatures and the subsequent greater tetragonality of the martensite that forms from that austenite. Also, it follows that the greater the tetragonality of the as-quenched martensite, the greater the contraction in specimen dimensions as tetragonality is relieved during the first and third stages of tempering.

Following the initial contraction on tempering, specimen dimensions expand as retained austenite with its close-packed crystal structure transforms to ferrite and cementite with more open crystal structures during the second stage of tempering. The expansion is greatest in specimens that retain more austenite because of exposure to high austenitizing temperatures for hardening, as demonstrated in Fig. 10-16. Therefore, if an absolute minimum in dimensional change is required, 02 tool steel, which can be hardened from low austenitizing temperatures that minimize both martensite tetragonality and retained austenite content, may be selected.

Selection and Applications

By far the most popular oil-hardening steel is the Ol grade. O1 tool steel can be hardened from a relatively low austenitizing temperature, has sufficient hardenability to produce adequate depth of hardening and surface hardness in all but the very largest tools, is not sensitive to grain growth on overheating, has slightly higher toughness than the other oil-hardening steels, and is the most widely available of the O-type steels.

O2 tool steel exhibits the lowest dimensional changes on heat treatment. Type O6 tool steel, by virtue of graphite distribution in its microstructure, provides good machinability for the fabrication of intricate dies, and type O7 is the most wear resistant of the oil-hardening tool steels and may be preferred for tooling applications for longer production runs.

Table 10-1 Composition limits of oil-hardening cold-work steels

Fig 4-10 Effect of austenitizing temperature on as-quenched hardness of oil-hardening cold-work die steels.

Fig 5-10 Jominy end-quench hardenability curves for 0 1 tool steel.

Fig 6-10 Jominy end-quench hardenability curves for 07 tool steel.

Fig 7-10 Effect of tempering temperature on the hardness of oil-hardening cold-work die steels

Fig 8-10 Unnotched Izod impact strength as a function of tempered hardness level for O-type tool steels. Note that in the usual working hardness range (57 to 64 HRC), type O1 has the highest impact strength.

Fig 9-10 Effect of tempering temperature on toughness ratings of 0 1 tool steel

Table 10-4 Tensile properties of O1 and O7 tool steels

Fig 15-10 Dimensional changes in O1 tool steel as a function of tempering temperature.

Fig 16-10 Length changes as a function of tempering temperature for 01 and 0 7 tool steels quenched from indicated temperatures. AN, Annealed; AQ, as quenched.

Customers comments